LinkForge Documentation
Everything you need to install, configure and run your own premium, AI-native link platform - branded short links, QR codes, link-in-bio pages, deep analytics and safety scanning, on hosting you own.
New here? Start with Server requirements, then follow the cPanel install guide - most sites are live in about 10 minutes. Already installed? Jump to Configuration to set up email, payments and integrations.
/docs (linked from the admin header).Overview
Table of contents
The guide is organised into nine chapters, from a first install through to the developer API. Pick a chapter to dive in, or use a quick link below for the most common tasks.
/api/v1) and outbound webhooks for your own integrations.
08MaintenanceUpdating LinkForge, backups, troubleshooting and a frequently-asked-questions list.
09ReferenceOpen-source credits, the changelog and how to reach support.
Quick navigation
Getting started
Introduction
LinkForge is a complete, self-hosted link-management platform you install on your own hosting. It does everything a modern link business needs - and it's yours: no per-click fees, no monthly platform charges, full source access, and your data stays on your server.
You can run LinkForge two ways, often at the same time:
- For yourself / your team - shorten and brand links, generate QR codes, build link-in-bio pages, and track every click.
- As a paid service (SaaS) - let customers sign up, choose a plan, connect their own domains, and pay you through Stripe, PayPal or crypto. LinkForge handles registration, plans, billing, limits and invoicing.
What you can do with it
Branded short links
Custom domains, custom aliases, passwords, expiry, click limits, UTM builder and A/B rotation.
QR Code studio
Styled, scannable QR codes for links, Wi-Fi, vCards and more - with logos, colors and saved templates.
Link-in-bio pages
Mobile-first profile pages with link blocks, themes, lead capture, vCard download and gates.
Deep analytics
Clicks over time, country & city map, devices, browsers, referrers - with CSV export.
AI assistant optional
Suggests link aliases, writes titles and bio copy, answers plain-English questions about your traffic, and summarises a link's performance. Powered by any OpenRouter model or Claude.
Safety scanning
Blocklists, disposable-email blocking, Cloudflare Turnstile, URLhaus, VirusTotal and Google Web Risk.
How LinkForge is built
LinkForge is a standard Laravel 12 / PHP application backed by MySQL or MariaDB. It is designed to run comfortably on ordinary cPanel shared hosting - no command line, no Docker and no background daemons are required. The full source code is included and unencoded, so a developer can read and extend it freely.
What's included in your download
Your CodeCanyon download contains everything needed to go live:
| Item | Description |
|---|---|
| linkforge-v1.0.x.zip | The complete application, ready to upload to your host. Includes the vendor/ folder and pre-compiled assets, so no Composer or build step is needed. |
| public/docs/ | This complete documentation. Open public/docs/index.html in any browser offline, or visit /docs on your live site (also linked from the admin header). It covers installation, every setting, the customer and admin guides, the API and more, so it is the single place to look. |
| .env.example | A starter environment file. The installer creates your real .env for you, so you normally never edit this by hand. |
| THIRD_PARTY_LICENSES.md | Required attribution and license notices for the bundled open-source components and data (see Sources & credits). Keep this file in your install. |
Server requirements
LinkForge runs on virtually any modern PHP host, including budget cPanel shared hosting. You need:
| Requirement | Minimum | Notes |
|---|---|---|
| PHP | 8.2, 8.3 or 8.4 | Set this in cPanel → Select PHP Version. |
| Database | MySQL 5.7+ or MariaDB 10.3+ | One empty database with a user that has all privileges. |
| Web server | Apache or LiteSpeed (cPanel), or Nginx (VPS) | mod_rewrite must be on - it is by default on cPanel. |
| PHP extensions | pdo_mysql, mbstring, openssl, tokenizer, ctype, json, fileinfo, curl, gd, zip, xml, bcmath - all standard on cPanel. | |
| HTTPS | Recommended | Free with cPanel AutoSSL or Let's Encrypt. Needed for secure cookies, passkeys and gateway webhooks. |
| Cron | One entry, every minute | Powers analytics rollups, scheduled jobs and cleanup - see Cron / scheduler. |
Quick start (about 10 minutes)
The short version for those who just want to get going. Each step links to full detail below.
- Create a database in cPanel → MySQL Databases, plus a user with all privileges. Details →
- Set PHP to 8.2+ in cPanel → Select PHP Version.
- Upload & extract the LinkForge zip into your domain or subdomain folder. Details →
- Open your domain in a browser - the installer starts automatically. Follow the five steps. Details →
- Add the cron job so analytics and scheduled tasks run. Details →
- Sign in and configure email, branding and (for a SaaS) payments under Admin → Settings. Details →
Installation
Installing on cPanel / shared hosting
This is the most common setup and needs no SSH or Composer access - everything happens in cPanel and your browser. Estimated time: 10 minutes.
Step 1 - Create the database
- Open MySQL® Databases in cPanel.
- Create a database - under Create New Database enter a name like
linkforgeand click Create Database. cPanel prefixes it, so the full name becomes something likeyouruser_linkforge. - Create a user - under MySQL Users → Add New User, add a user with a strong password.
- Grant access - under Add User To Database, select the user and database, click Add, then tick ALL PRIVILEGES and save.
- Write these down - you'll enter them in the installer:
Database name youruser_linkforgeDatabase user youruser_linkforgeDatabase password the password you set Database host localhost(or127.0.0.1)
Step 2 - Set the PHP version
Open Select PHP Version (sometimes called MultiPHP Manager) and set the domain or account to PHP 8.2 or newer. In the Extensions tab, confirm the extensions in Server requirements are ticked - most are on by default.
Step 3 - Choose where it lives
LinkForge can run on your main domain (e.g. yourbrand.com, folder public_html) or a subdomain (e.g. links.yourbrand.com). Both work - pick whichever you prefer.
Step 4 - Upload & extract
- Open File Manager and go to your site's folder (public_html for the main domain, or the subdomain's folder).
- Upload the LinkForge zip.
- Extract it. Right-click the zip → Extract. You should now see app/, public/, vendor/, artisan and .htaccess directly in that folder. If extraction created an extra wrapper folder, move the files up one level.
Then pick one - both are fully supported
Option A - Point the document root at public/ (most secure, recommended). In cPanel → Domains, set the domain's Document Root to the public folder (e.g. …/public_html/public). Done.
Option B - Leave the document root as-is (no change needed). The bundled root .htaccess automatically serves the app from public/ and blocks direct access to .env, app/, vendor/ and friends. This is the "extract and go" path. Both options keep your source and .env unreachable from the web.
Step 5 - Set folder permissions
In File Manager, make sure these are writable (right-click → Change Permissions → 755). On most cPanel hosts they already are, and the installer's first screen flags anything that isn't.
- storage/ (and everything inside it)
- bootstrap/cache/
- public/uploads/ (for avatars and bio uploads)
Now open your domain in a browser and continue with The setup wizard →
The setup wizard, step by step
The first time you visit your domain after uploading, LinkForge launches a friendly five-step installer in your browser. You never touch a config file by hand.
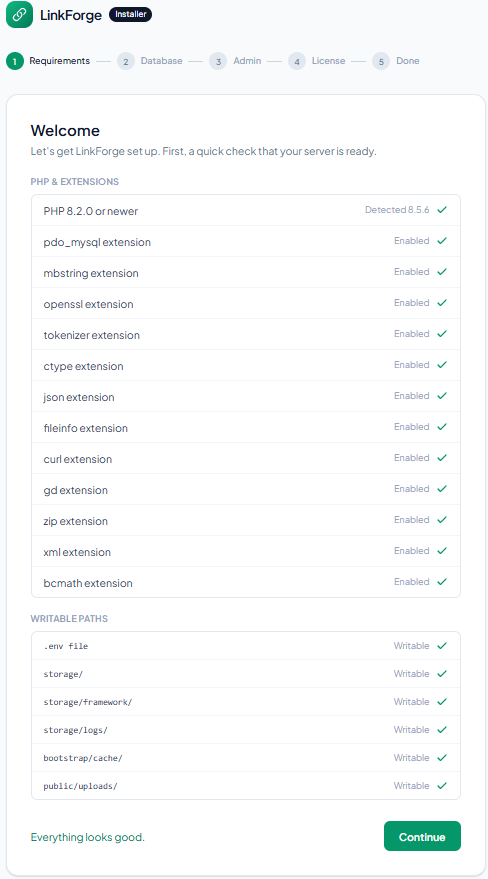
1 · Requirements
A green / red checklist of PHP version, extensions and folder permissions. When everything is green, click Continue. If something is red, fix it (usually the PHP version or a folder permission) and refresh.
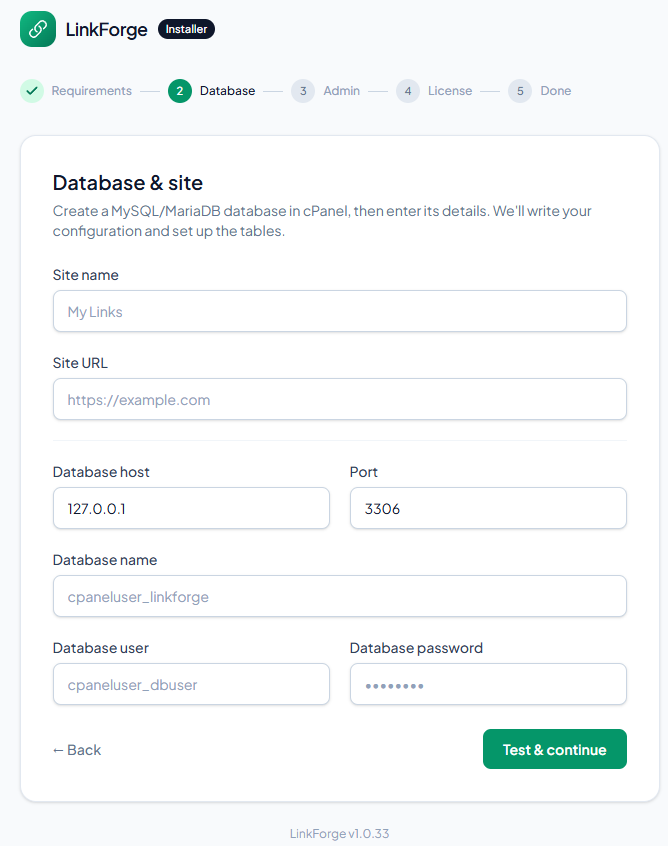
2 · Database & site
Enter your site name, your site URL (e.g. https://links.yourbrand.com), and the four database details you wrote down in Step 1. Click Test & continue - LinkForge verifies the connection before moving on, then runs the database setup automatically.
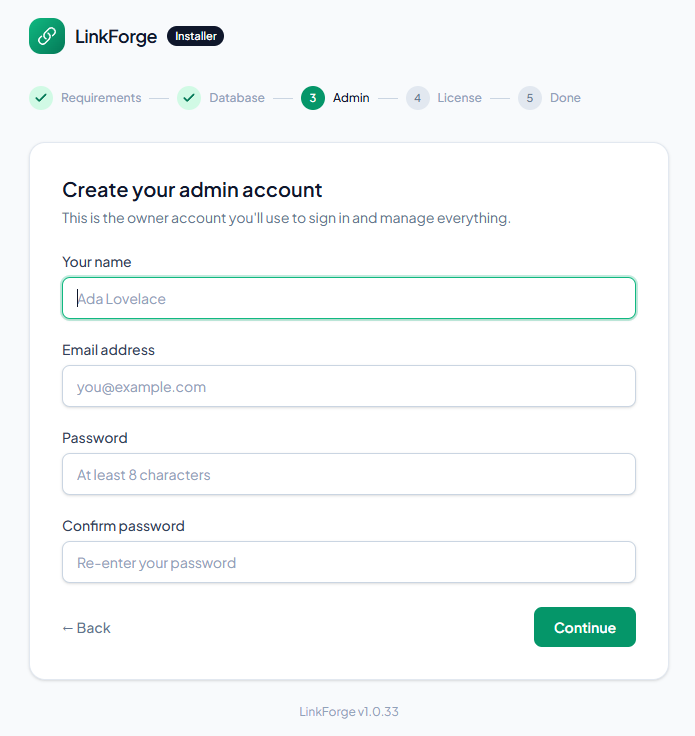
3 · Admin account
Create your owner login - name, email and password. This is your admin account; you'll use it to sign in and manage everything.
4 · License
Enter your CodeCanyon purchase code to complete the install. A valid code is required - there is no skip - so have it ready before you start. See License & purchase code for where to find the code and how verification works.
5 · Done
The installer seals itself (so it can't be run again) and hands you a Sign in button. Log in with the admin account you just created - you'll land on your new dashboard.
Installing on a VPS / generic server
If you have root access (DigitalOcean, Linode, AWS, etc.), point your web server's document root at LinkForge's public/ folder and run the same browser installer. Two sample virtual hosts:
Nginx - /etc/nginx/sites-available/linkforgeserver {
listen 80;
server_name links.yourbrand.com;
root /var/www/linkforge/public; # LinkForge public/ folder
index index.php;
location / { try_files $uri $uri/ /index.php?$query_string; }
location ~ \.php$ {
include fastcgi_params;
fastcgi_pass unix:/run/php/php8.3-fpm.sock;
fastcgi_param SCRIPT_FILENAME $realpath_root$fastcgi_script_name;
}
}<VirtualHost *:80>
ServerName links.yourbrand.com
DocumentRoot /var/www/linkforge/public
<Directory /var/www/linkforge/public>
AllowOverride All
Require all granted
</Directory>
</VirtualHost>Permissions
Make storage/ and bootstrap/cache/ writable by the web-server user:
cd /var/www/linkforge
sudo chown -R www-data:www-data storage bootstrap/cache
sudo chmod -R 775 storage bootstrap/cache
Then issue a TLS certificate (e.g. certbot --nginx), open your domain, and complete the setup wizard as normal.
Cron / scheduler setup
LinkForge uses a once-a-minute scheduler to roll up analytics, deliver webhooks, send queued emails and clean up expired data. Add this one cron entry and you're set - it's the only background task LinkForge needs.
In cPanel → Cron Jobs, add a job that runs every minute:
* * * * * /usr/local/bin/php /home/youruser/linkforge/artisan schedule:run >/dev/null 2>&1php.Post-install checklist
Once you can sign in, run through these to get production-ready:
- ✅ Cron job added (previous section) - confirm analytics populate after a few clicks.
- ✅ HTTPS active - run AutoSSL / certbot so your site is served over
https://. - ✅ Email configured - set SMTP under Admin → Settings → Email and send a test, so password resets and notifications work.
- ✅ Branding - upload your logo and pick a theme under Appearance.
- ✅ Payments (SaaS only) - connect a gateway under Billing and review your plans.
- ✅ Purchase code - entered during install (it is required), so your copy is registered for updates and support.
- ✅ Backups - set up a routine database + files backup (see Backups).
License & purchase code
LinkForge is sold under the standard Envato / CodeCanyon license. During install you must enter your purchase code to register your copy and finish setup. It is required, and there is no skip, so have it ready before you begin.
Where to find your purchase code
- Sign in to CodeCanyon and open Downloads from your account menu.
- Find LinkForge and click Download → License certificate & purchase code (PDF or text).
- Copy the Item Purchase Code (a long code like
1a2b3c4d-…) and paste it into the installer's License step.
How verification works
When you submit the code, the installer verifies it against Envato through a small verification service and then completes setup. A valid code is required to finish: an empty, malformed, or genuinely invalid code is rejected with an error so you can correct it.
Verification fails open for outages only. If the verification service itself is temporarily unreachable, a network error will not block your install, and once installed your site keeps running normally with no ongoing license checks that could ever lock you out.
Configuration
Settings overview
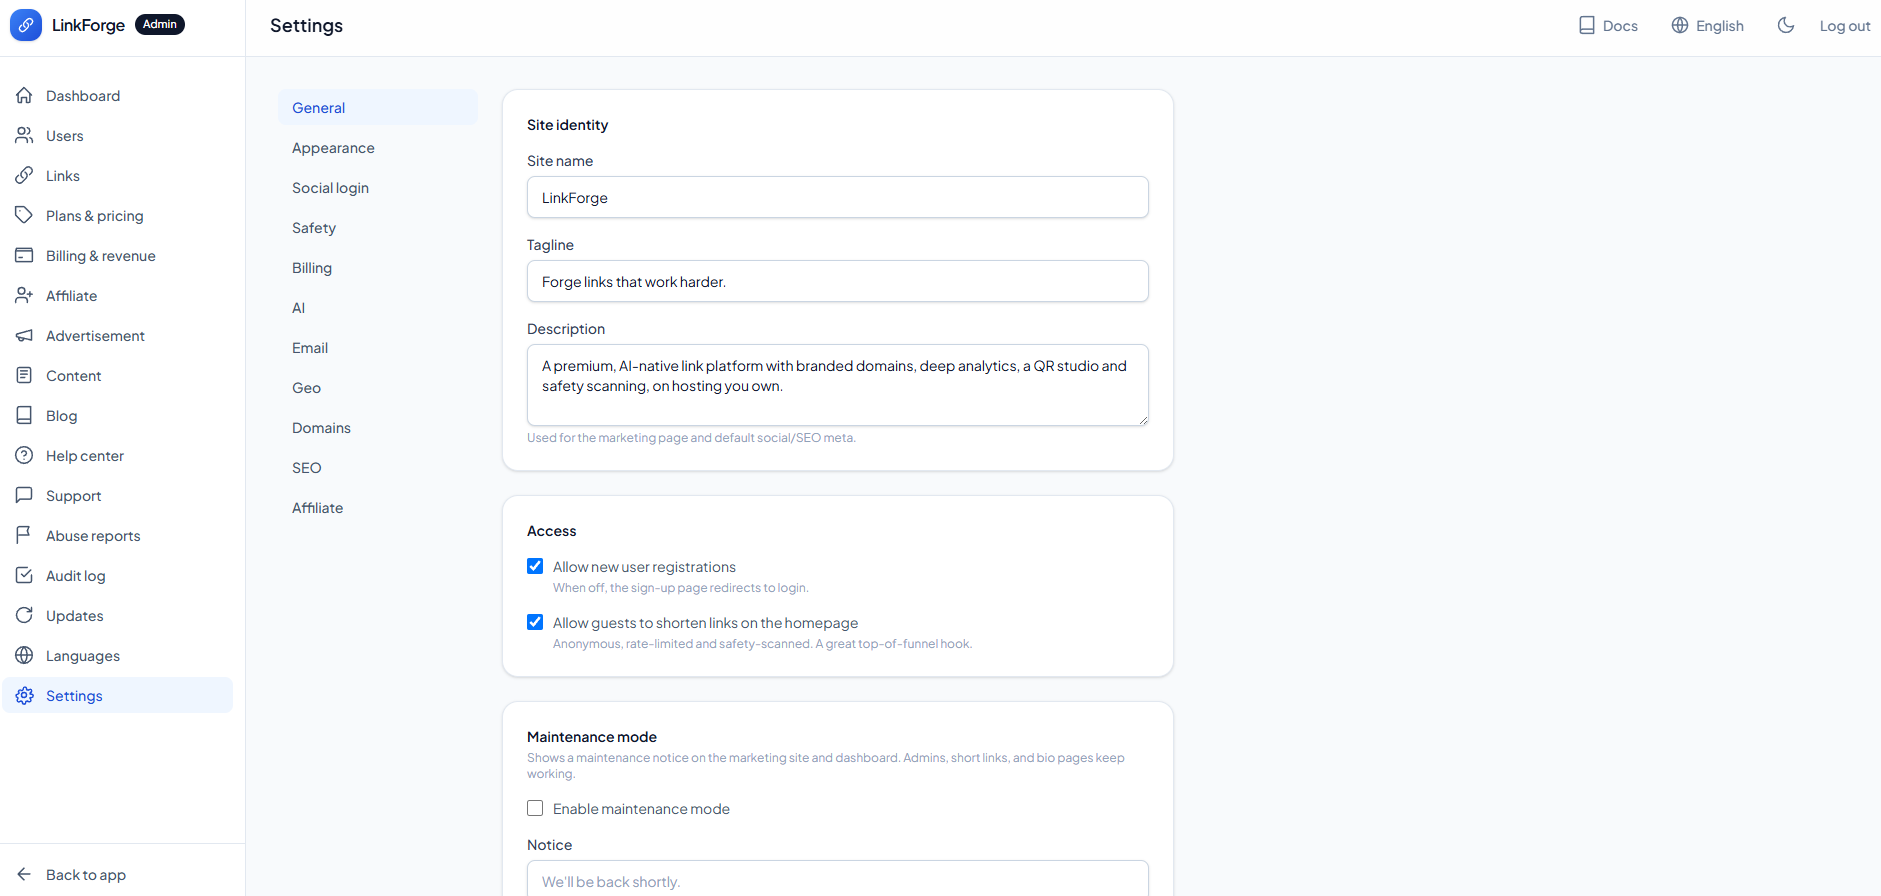
Almost everything is configured from one place - Admin → Settings - using ordinary forms. There is no need to edit files; changes are saved to the database and applied instantly. Settings are grouped into tabs across the top:
| Tab | What you set |
|---|---|
| General | Site name, localization, registrations & default plan, announcement banner, cookie consent, maintenance mode & tools. |
| Appearance | Logo, favicon, color theme, font, default light/dark scheme, custom CSS/head code and footer. |
| Social login | Google / GitHub / Facebook sign-in. |
| Safety | Blocklists, threat feeds, Turnstile CAPTCHA. |
| Billing | Payment gateway and currency. |
| AI | AI provider, model and credit costs. |
| SMTP server and notification templates. | |
| Geo | GeoIP database for country / city analytics. |
| Domains | What customers point their domains at. |
| SEO | Meta description, share image, analytics IDs. |
| Affiliate | Referral program and commissions. |
General & access
- Site name, tagline & description - used across the marketing page, emails and as your default SEO text.
- Localization - set your timezone (all dates and times display in it) and the date format used across the app.
- Allow new registrations - turn customer sign-ups on or off. Turn this off if LinkForge is just for you or your team.
- Allow guests to shorten - lets anonymous visitors shorten a link straight from your homepage (a great lead magnet for a SaaS).
- Registration controls - choose the default plan new accounts start on, and block sign-ups from specific email domains (one per line).
- Announcement banner - show a dismissible message across the public site and customer dashboard (info, warning or success style). Editing the text re-shows it to everyone.
- Cookie consent - show a dismissible cookie notice to visitors, in your own wording.
- Maintenance mode - show a friendly notice and pause public access while you make changes. Admins, short links and bio pages keep working.
Maintenance tools
Run common upkeep tasks from this tab without shell access, handy while the cron job is still being set up:
- Clear caches - clears the config, route, view and application caches (use this if something looks stale after a settings change).
- Run analytics rollup - processes new clicks into the reports immediately.
- Process queued jobs - sends any pending emails and webhooks now.
Appearance & white-label branding
Make LinkForge yours. Nothing here requires touching code or rebuilding assets.
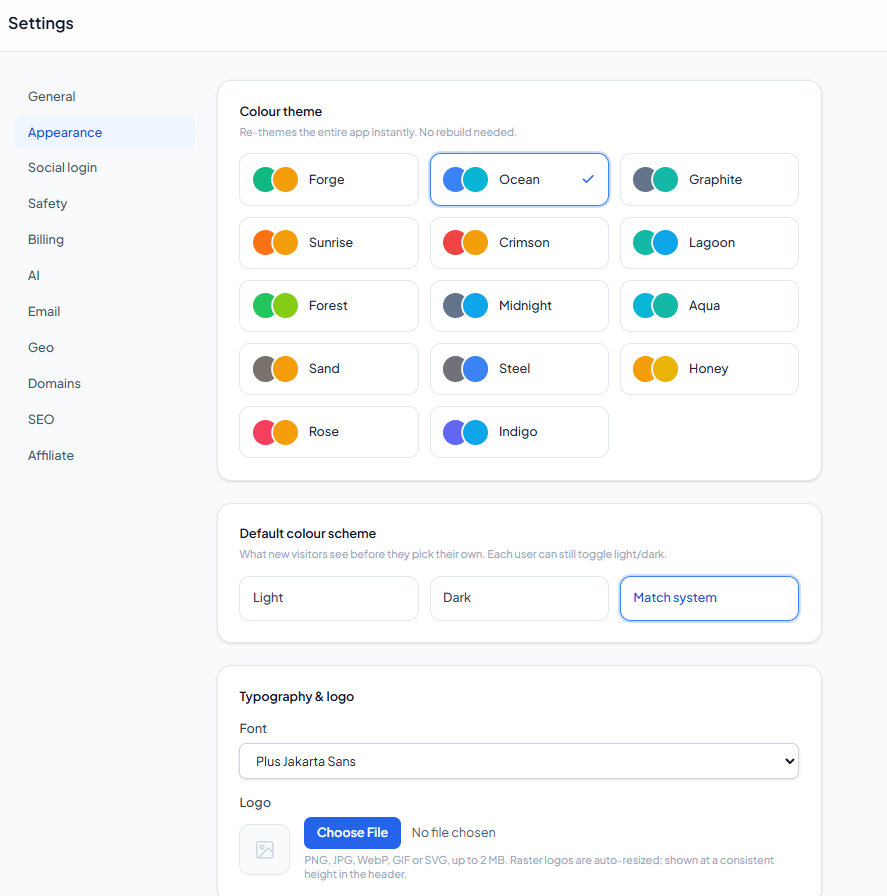
- Logo - upload a PNG, SVG, JPG or WebP (max 2 MB). It appears in the header, login and emails. Tick Remove to clear it and fall back to the bundled default logo.
- Favicon - upload your own browser-tab icon (PNG, SVG or ICO, square, up to 1 MB). It replaces the bundled icon everywhere, including the admin panel. Tick Remove to fall back to the default.
- Color theme - choose a built-in preset: Forge (emerald + amber), Sapphire (blue + sky), Sunset (amber + rose) or Graphite (slate + teal). The whole UI re-colors instantly.
- Default color scheme - Light, Dark or System (follows the visitor's device). Each visitor can still override it with the header toggle.
- Font - pick from the bundled, self-hosted font families.
- Custom code - add your own Custom CSS and Custom head HTML (fonts, meta tags or trusted third-party snippets). Both inject into the public site and customer dashboard, never the admin panel.
- Footer - override the small copyright line on the public site. HTML is allowed (e.g. links); use
{year}for the current year. Leave blank for the default.
Email (SMTP)
Email powers password resets, verification, billing receipts and notifications. Configure an SMTP server so messages actually deliver. Any provider works - Mailgun, SendGrid, Amazon SES, Postmark, Brevo, or your host's own SMTP.
| Field | Example |
|---|---|
| SMTP host | smtp.mailgun.org |
| Port | 587 (STARTTLS) or 465 (SSL) |
| Encryption | tls for 587, ssl for 465 |
| Username / Password | From your email provider |
| From address / name | hello@yourbrand.com · YourBrand |
Send a test email
After saving your SMTP settings, click Send test email on this tab to send a message to your own address and confirm delivery works, without having to trigger a real password reset.
Notification templates & staff alerts
Lower on the same tab you can enable/disable each automated email and edit its subject and body. Templates support placeholders like {{ name }} that are filled in automatically. These cover customer emails (welcome, password reset, ticket replies, billing receipts) and staff alerts to your team when a new customer signs up, opens a support ticket, or reports a link for abuse.
Payment gateways
Only needed if you charge customers. On the Billing tab, choose your gateway and currency. LinkForge supports five options out of the box; pick one.
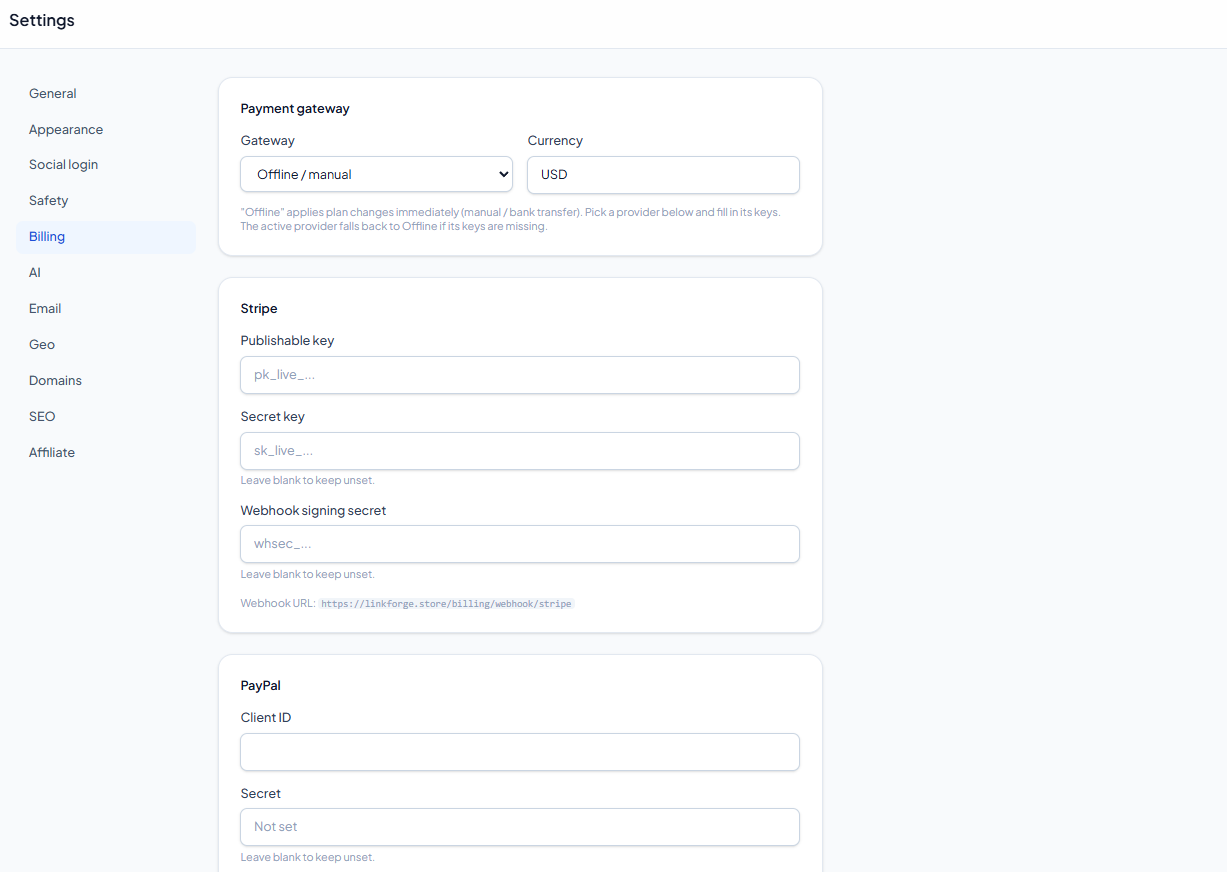
Offline / manual
The default. Plan changes apply immediately with no online payment - perfect for bank transfer, invoicing, a private install, or testing. No keys needed.
Stripe (cards)
- In your Stripe Dashboard → Developers → API keys, copy the Publishable key and Secret key.
- Paste them into the Stripe fields and save.
- Copy the Webhook URL LinkForge displays, then in Stripe → Webhooks add an endpoint with that URL. Copy the resulting Signing secret back into LinkForge.
PayPal
- In the PayPal Developer Dashboard, create an app and copy its Client ID and Secret.
- Paste them in, set Mode to live (or sandbox for testing), and save.
CoinPayments (multi-crypto)
Accept BTC, ETH and many other coins. From your CoinPayments account enter the Merchant ID, Public/Private keys, an IPN secret, and your preferred receive currency. Paste the displayed IPN URL into CoinPayments' IPN settings.
Crypto.com Pay
Enter your Secret key and a Webhook secret from your Crypto.com Pay merchant dashboard, then register the displayed Webhook URL there.
Plans & pricing
Plans define what customers get and what they pay. Manage them under Admin → Plans. Four plans are seeded by default; edit, delete or add your own.
| Plan | Price | Links | Domains | QR | Bio | AI credits | Key features |
|---|---|---|---|---|---|---|---|
| Free | $0 | 25 | 0 | 5 | 1 | 10 | - |
| Starter | $9/mo | 1,000 | 1 | 50 | 3 | 150 | Custom domains, API, ad-free |
| Pro | $29/mo | 10,000 | 5 | 1,000 | 25 | 1,500 | + Retargeting, deep links |
| Business | $99/mo | Unlimited | 25 | Unlimited | Unlimited | 15,000 | + White-label |
What you can configure per plan
- Price & interval - free, monthly, yearly or one-time lifetime.
- Limits - max links, monthly clicks, custom domains, QR codes, bio pages and AI credits. Leave a limit blank for unlimited.
- Feature flags - toggle Custom domains, Retargeting pixels, API access, Deep links, White-label and Ad-free.
Social login
Let users sign in with Google, GitHub or Facebook. Each provider is optional and off by default - when off, its button is hidden and its routes return 404. Configure them on the Social login tab.
For every provider the flow is the same:
- Create an OAuth app at the provider (links below) and copy its Client ID and Client secret.
- Set the redirect / callback URL at the provider to the value LinkForge shows you on the tab (it looks like
https://yoursite.com/auth/google/callback). - Paste the ID and secret into LinkForge, tick Enable, and save.
| Provider | Where to create the app |
|---|---|
| Google Cloud Console → Credentials → OAuth client ID (Web application) | |
| GitHub | GitHub → Developer settings → OAuth Apps |
| Meta for Developers → My Apps → Facebook Login |
https:// and no trailing slash), or the provider will reject the sign-in. Facebook additionally requires your app to pass their review before it works for the public.AI assistant optional
LinkForge's AI features - alias and title suggestions, "ask your links", per-link summaries, bio copy and the weekly insight - are completely optional. With no API key set, every AI surface is hidden and the app behaves exactly as before. You (the operator) own the AI spend, so you choose the provider and model.
Choose a provider
By default LinkForge uses OpenRouter on a cheap, fast model (openai/gpt-4o-mini), because every AI task here is simple and doesn't need a flagship model. Add one key and you're set. Configure it all on the Settings → AI tab.
- OpenRouter (default, recommended) - one key works with many models. Paste a key from openrouter.ai/keys into the OpenRouter API-key field; keep the default model, or set any slug (e.g.
openai/gpt-4.1-mini,google/gemini-2.0-flash-001,anthropic/claude-3.5-haiku). - Anthropic (Claude) - native Claude. Switch the provider to "Anthropic", paste a key from console.anthropic.com and pick a model.
With no key set for the active provider, every AI surface hides itself and the app behaves as if AI is off.
Credit costs
Each AI action - alias suggestion, ask-your-links query and the weekly insight - spends AI credits from the customer's monthly plan allowance (set per plan in Plans). On this tab you set how many credits each action costs, so AI spend stays predictable. Set the weekly-insight cost to 0 to make it free for everyone (operator-funded) instead of charging a credit.
Safety & abuse prevention
A shortener is only as healthy as the links it hosts. LinkForge layers several defences, all configurable on the Safety tab. Local checks run instantly at create time; external threat feeds are each opt-in and fail safe (a disabled or unreachable feed is simply ignored).
- Blocked domains & keywords - your own blocklist; any destination matching these is refused.
- Disposable-email blocking - built in, stops throwaway-inbox sign-ups.
- URLhaus - free, no key. Checks destinations against a live malware-URL feed.
- VirusTotal - paste an API key to scan destinations against 90+ engines.
- Google Web Risk - paste an API key to check against Google's threat database.
- Cloudflare Turnstile - a privacy-friendly CAPTCHA on public forms. Add your site key and secret from the Cloudflare dashboard. When unset, the CAPTCHA is simply skipped.
Geo / GeoIP database
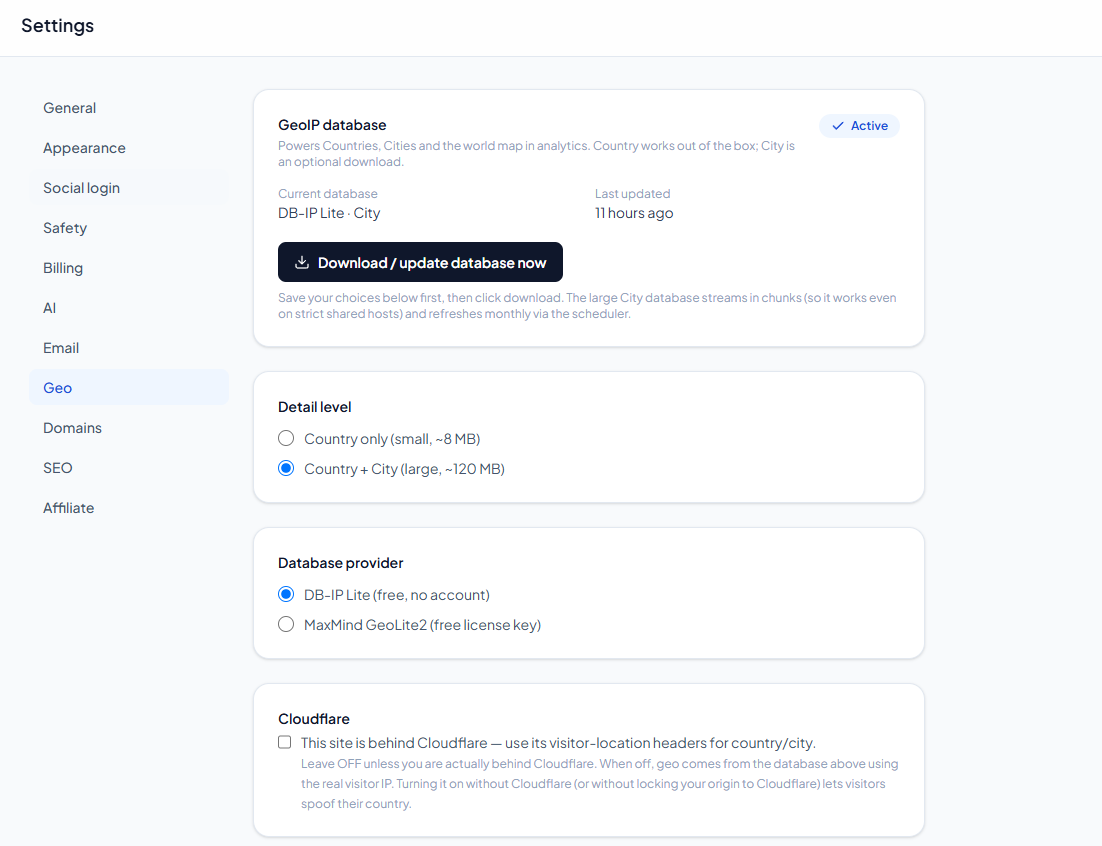
Analytics can show where clicks come from. LinkForge resolves location two ways, configured on the Geo tab:
- Cloudflare headers - if your site sits behind Cloudflare (free), country is read straight from Cloudflare's visitor headers with zero setup.
- Local GeoIP database - a MaxMind-format .mmdb file. A country-level database is bundled, so country analytics work out of the box. For city-level detail, download a city database from the tab with one click (DB-IP, no account required) or supply a MaxMind license key.
SEO & social sharing
Control how your marketing pages appear in search and when shared. On the SEO tab:
- Meta description - the default description for search engines.
- Open Graph title, description & image - the card shown when your site is shared on social media. The share image should be 1200×630 px.
- X / Twitter handle - attributes shared cards to your account.
- Google Analytics & Tag Manager IDs - paste a
G-XXXXXXXXXXorGTM-XXXXXXXID to add your own tracking to the public pages.
LinkForge also generates an XML sitemap at /sitemap.xml (covering your marketing, blog, help and published pages) and serves a dynamic /robots.txt that points crawlers to it while keeping the admin and API areas out of the index. Both are automatic, with no setup needed.
Affiliate program
Reward customers for referring others. Enable and tune the program on the Affiliate tab:
- Enable affiliate program - switches on referral links and the customer affiliate dashboard.
- Commission type & value - a percentage of the referred payment, or a fixed amount.
- Cookie window - how many days a referral is attributed after the first click (1–365).
- Minimum payout - the balance a customer must reach before they can request a payout.
You review and approve commissions and payouts under Admin → Affiliate; customers see their stats under their Affiliate page.
Custom domains (operator setup)
One of LinkForge's headline features: customers can serve short links from their own branded domain (e.g. go.theirbrand.com). Two independent things must be true for that to work:
- DNS - the customer points their domain at your server (they do this; LinkForge shows them the exact records).
- Your web server answers for that hostname - this is your one-time setup, below. Without it, the customer's domain shows your host's 404 even when DNS is correct.
On a VPS / server with root - recommended for SaaS
Add a catch-all virtual host that serves LinkForge for any hostname. Then every customer domain works the moment its DNS points at you - zero work per domain.
Nginx - catch-all server blockserver {
listen 80 default_server;
server_name _; # matches ANY hostname
root /var/www/linkforge/public;
index index.php;
location / { try_files $uri $uri/ /index.php?$query_string; }
location ~ \.php$ {
include fastcgi_params;
fastcgi_pass unix:/run/php/php8.3-fpm.sock;
fastcgi_param SCRIPT_FILENAME $realpath_root$fastcgi_script_name;
}
}For automatic HTTPS on every customer domain, Caddy with on-demand TLS is the simplest option - it fetches a certificate the first time each domain is hit:
Caddyfilehttps:// {
tls you@yourbrand.com { on_demand }
root * /var/www/linkforge/public
php_fastcgi unix//run/php/php8.3-fpm.sock
file_server
}On cPanel / shared hosting (no root)
A true catch-all isn't possible without root, so use one of these:
- Branded subdomains (best fit, fully self-service). Create a wildcard subdomain
*.links.yourbrand.comwith its document root set to LinkForge's public/, add a DNS A-record*.links.yourbrand.com → your IP, and run AutoSSL. Now anycustomername.links.yourbrand.comworks automatically. - A customer's own domain (manual, per domain). If LinkForge is on your main domain, add the customer's domain as an Alias (it shares the main document root - nothing else to do). If LinkForge is on a subdomain, add it as an Addon domain with its document root set to LinkForge's public/. Then run AutoSSL for that domain.
- SSL-for-SaaS proxy. At scale on shared hosting, a service like Cloudflare for SaaS terminates TLS for many customer domains and forwards to your install.
Tell customers what to point at
On the Settings → Domains tab, set the CNAME target (the host customers point a subdomain at) and your Server IP (for customers connecting a root domain via an A-record). These exact values are shown to every customer on their Custom domains page - they never see your server internals.
Using LinkForge
The customer dashboard
This chapter describes the day-to-day experience for a signed-in user. It's useful for you to know, and you're welcome to reuse any of it in your own customer-facing help content.
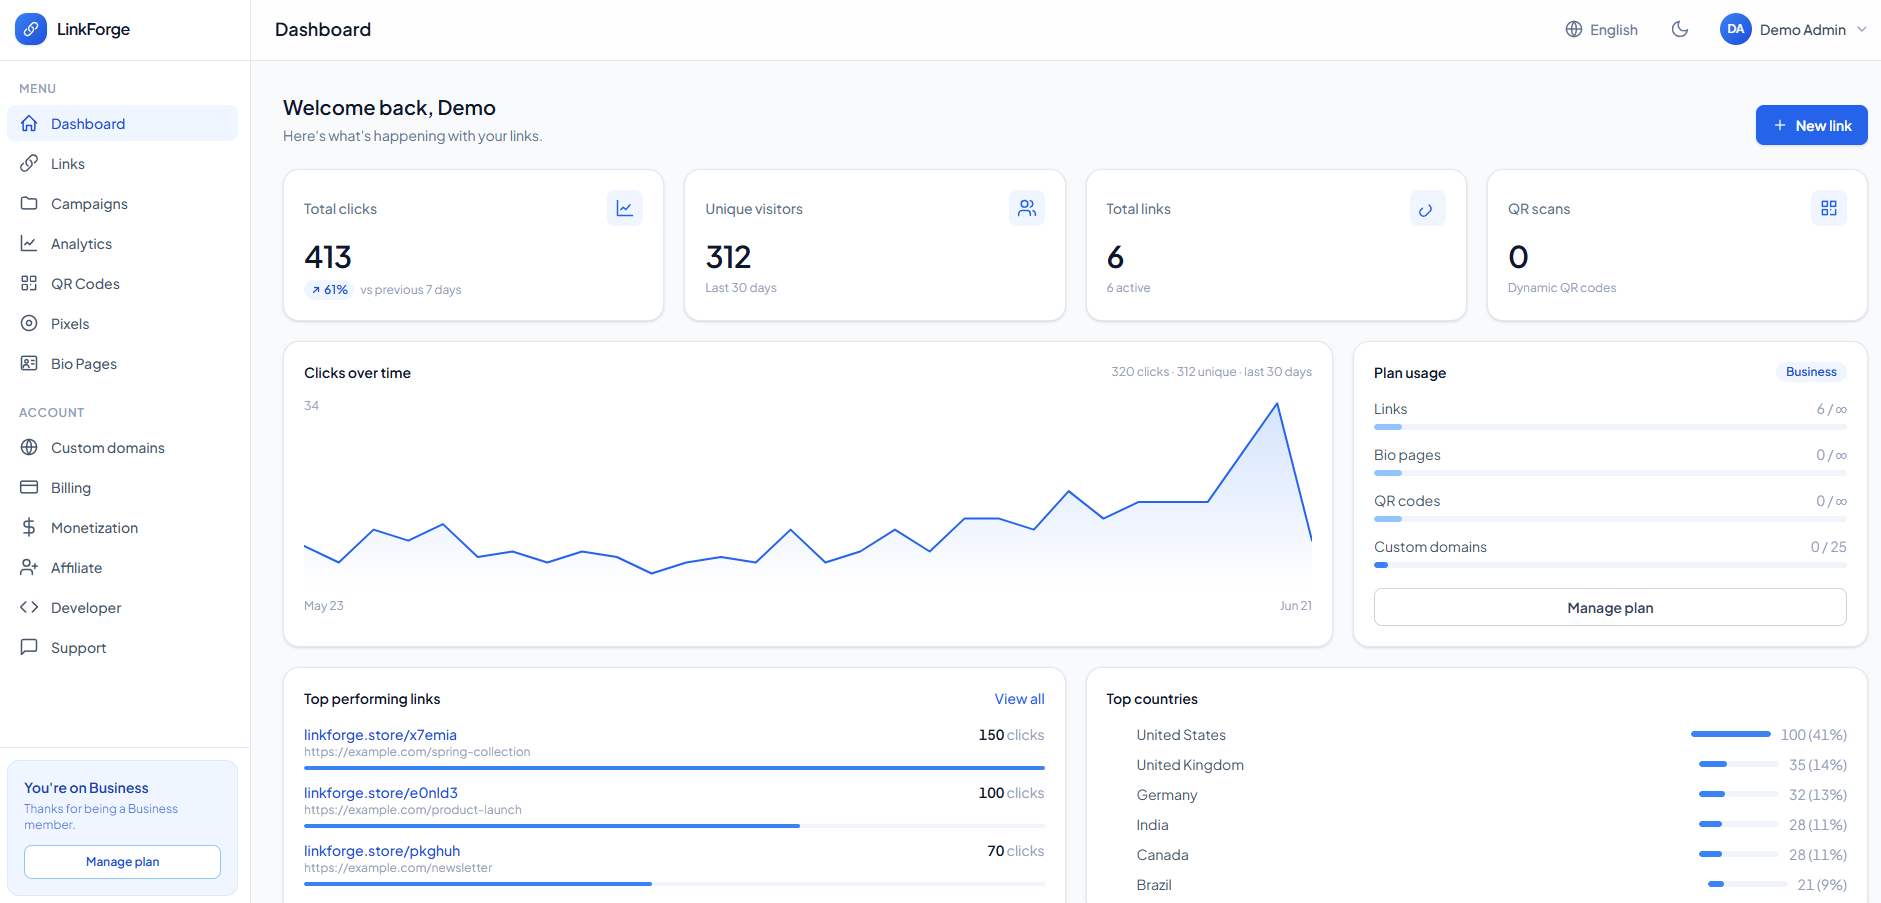
After signing in, users land on the Dashboard - an at-a-glance overview with total clicks, top links, recent activity, a clicks-over-time chart and their current plan usage. The left sidebar is the main menu: Links, Campaigns, QR Codes, Bio Pages, Analytics, and so on.
Creating short links
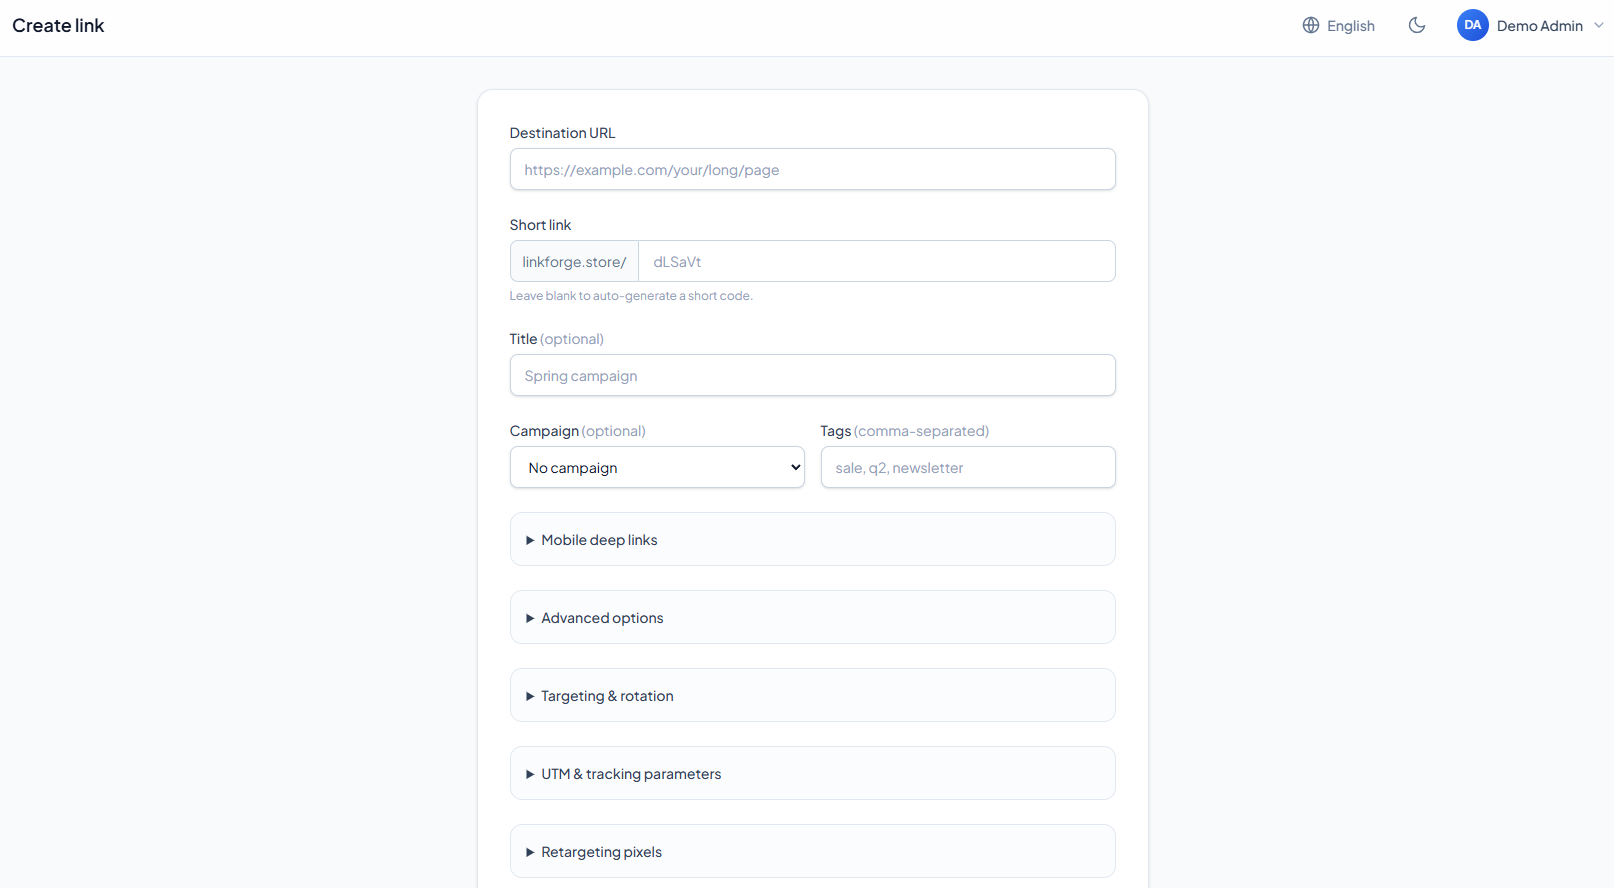
From Links → Create, a user pastes a destination URL and gets a short link. That's the minimum - but a link can do far more. The create form is organized into simple sections:
- Destination URL - where the link sends visitors.
- Short link - choose a domain (if more than one is available) and an optional custom alias; leave the alias blank to auto-generate a short code. If AI is enabled, a Suggest with AI button proposes memorable aliases.
- Title & tags - optional labels to keep links organized; assign a campaign too. If AI is enabled, Write title with AI fills the title (and a short description) from the destination URL.
Advanced options
| Option | What it does |
|---|---|
| Link type | Direct redirect, splash page, CTA overlay, frame or call-to-action. |
| Password | Visitors must enter a password before being redirected. |
| Expiry date | The link stops working after a set date/time. |
| Click limit | The link stops working after N clicks. |
| Active toggle | Pause or resume a link without deleting it. |
Targeting & rotation
Route different visitors to different destinations from a single short link. Rules can match by country, device, operating system, language or time of day - the first matching rule wins. Or split traffic with weighted rotation for A/B tests. Match examples: US,CA · mobile · 09:00-17:00.
UTM & tracking parameters
Build campaign tracking right into the link. Fill in utm_source, utm_medium, utm_campaign, utm_term and utm_content, or add custom key=value parameters. These are appended to the destination on redirect; any parameters already on the target are kept.
Mobile deep links Pro
Open a native mobile app instead of the browser. Enter the app's URI scheme (e.g. myapp://path) for iOS and Android; visitors without the app fall through to the normal destination.
Bulk create & import
Need many links at once? Links → Bulk creates them in a single pass, two ways:
- Paste a list - one destination URL per line. Each line becomes a short link, optionally sharing a campaign and tags that you set once for the whole batch.
- Import a CSV - upload a spreadsheet or an export from another platform. Columns are auto-detected: a Bitly export (with its Bitlink, Long URL, Title and Tags headers) maps automatically, and a simple headerless file also works (the first column is treated as the URL). This is the easy way to migrate, keeping each link's custom alias where it is still available.
Every row is processed safely. Each URL is safety-screened, duplicates inside the batch are skipped, an alias that clashes with an existing link is auto-renamed, and the whole batch respects the plan's link limit (it stops cleanly at the cap rather than erroring). When it finishes, a summary shows how many links were created and how many were skipped, with the reason for each skip.
Campaigns & tags
Campaigns and tags keep a growing link library organised and let users measure a whole marketing push at once, instead of link by link.
- Campaigns - create a campaign with a name and colour, then assign links to it from the link form or during a bulk import. The Campaigns page lists each campaign with its link count and total clicks.
- Tags - add comma-separated tags to any link for lighter, cross-campaign grouping (for example
q2,sale,email). - Filtering - the Links list can be filtered by campaign or by tag, so finding every link in a push takes one click.
- Combined analytics - open a campaign to see aggregated performance across all of its links (clicks over time, top countries, devices and referrers) and export it as CSV.
Deleting a campaign never deletes links; it simply unassigns them, so nothing is lost.
QR Code studio
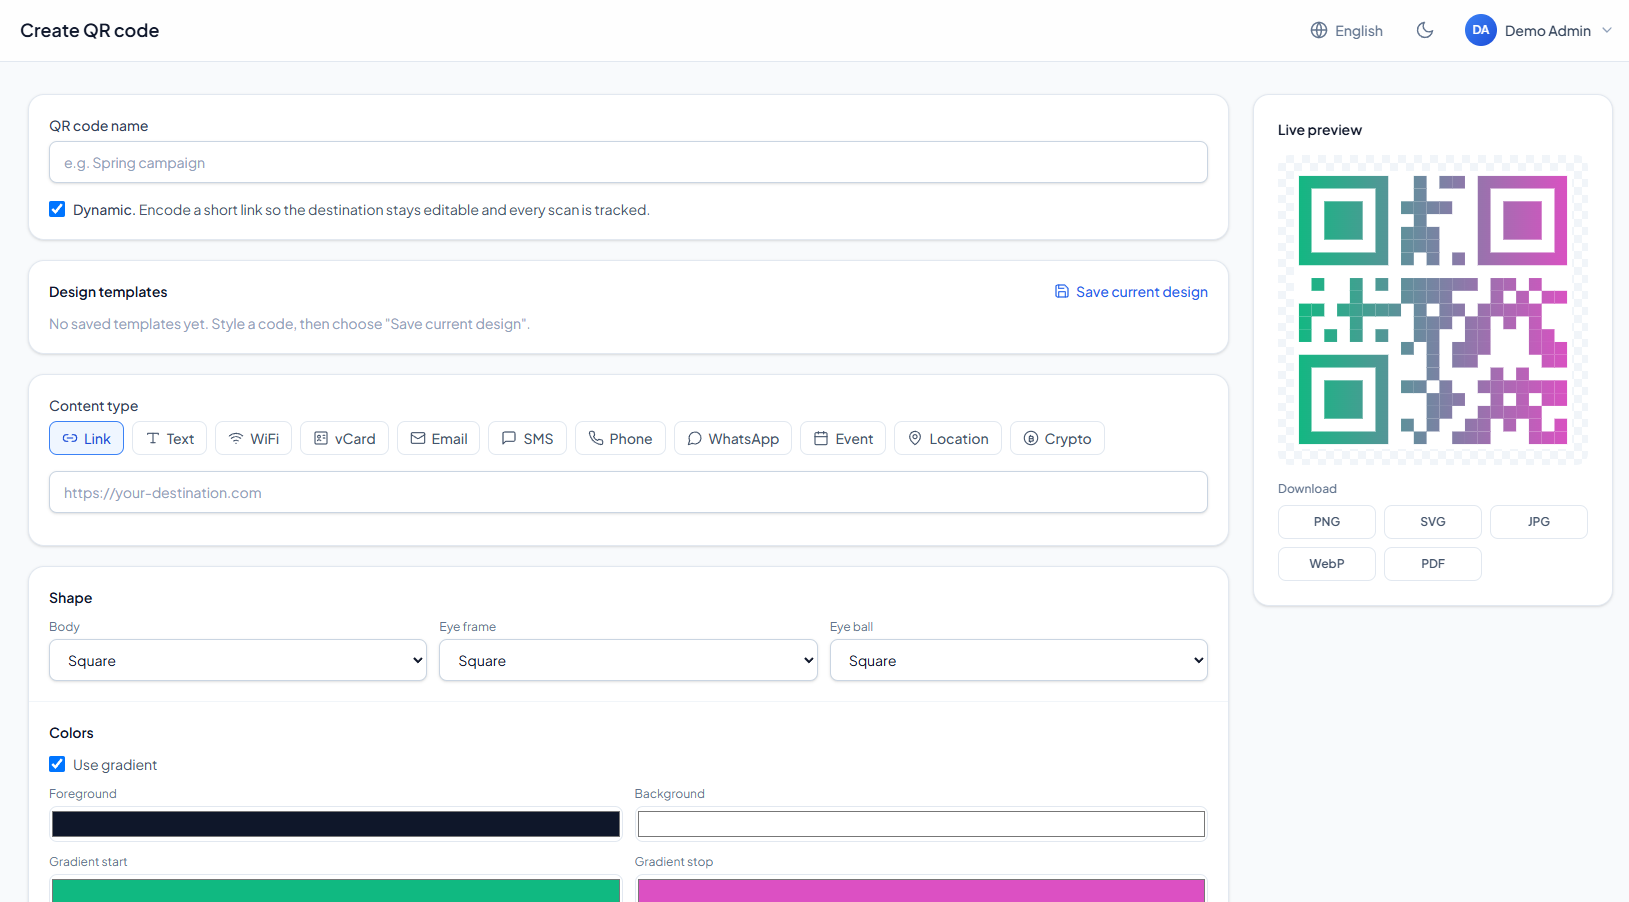
The QR section is a full studio for designing scannable codes - not just for links, but for many content types (URL, plain text, Wi-Fi credentials, vCard contact, email, phone, SMS and more). Users can:
- Style the code - foreground/background colors, dot and corner styles, and a center logo.
- Download as PNG or vector for print.
- Save reusable templates so brand styling is one click next time.
- Bulk-generate many codes at once.
Every short link also has its own QR code on its detail page. QR codes are tracked, so scans show up in analytics.
Link-in-bio pages
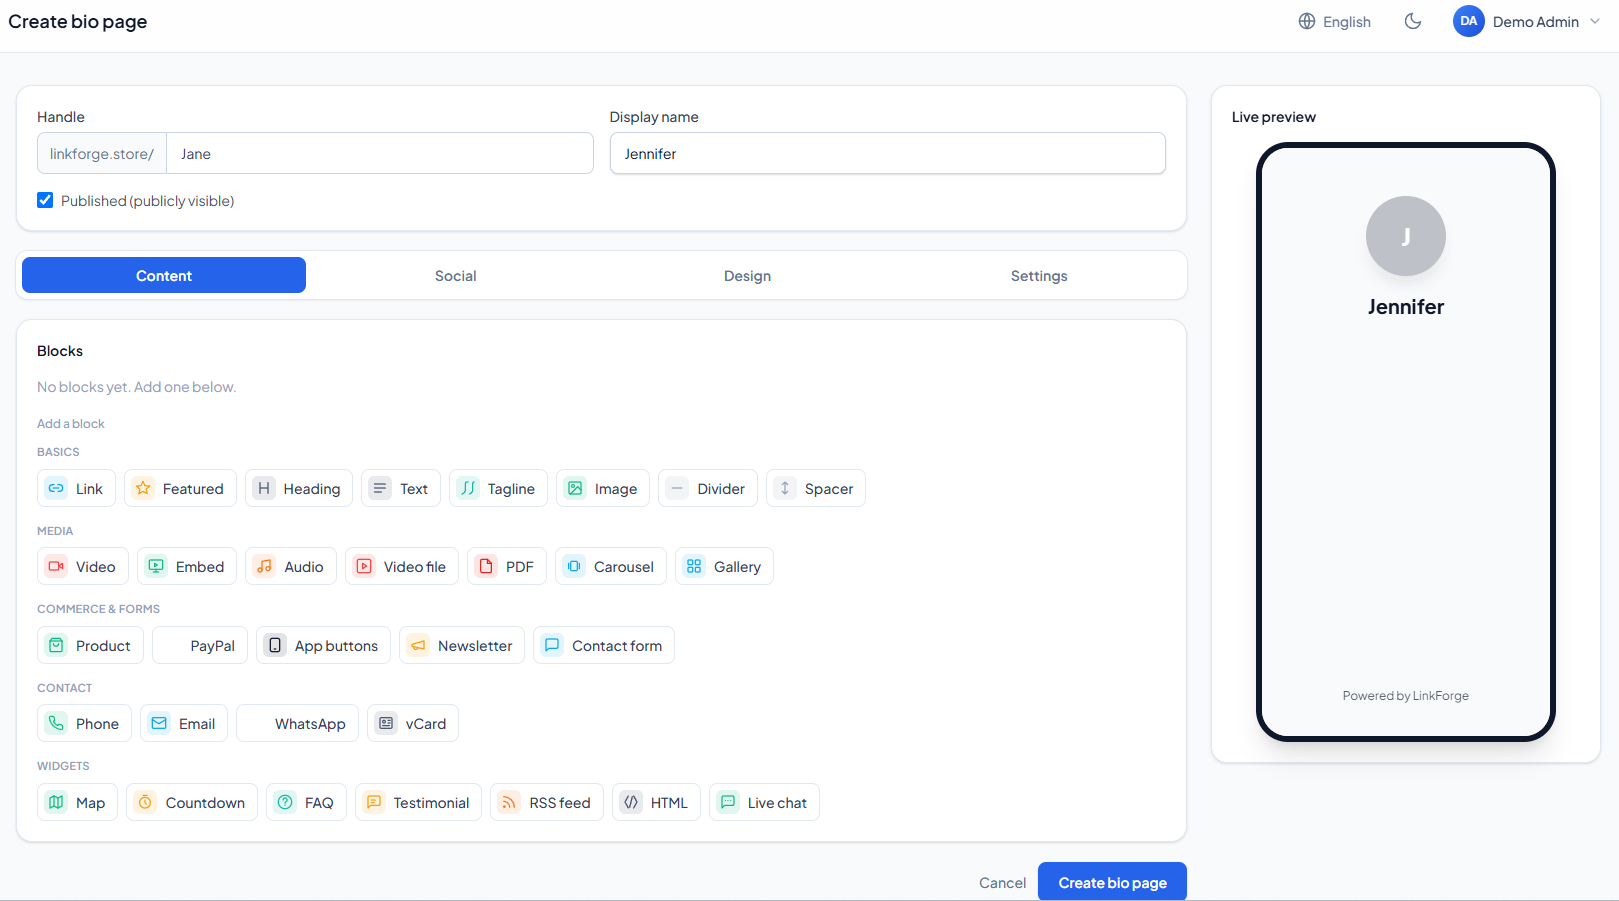
A bio page is a mobile-first profile page (like Linktree) hosted on your platform at yoursite.com/their-handle. From Bio Pages, users build a page by adding:
- Link blocks - buttons that point to any URL, reorderable by drag.
- Profile - avatar, name, bio text and social icons.
- Themes - colors, background and fonts, all sanitized for safety.
- Lead capture - an email subscribe form and a contact form; collected leads are exportable.
- vCard - a "save contact" button that downloads a contact card.
- Gates - optionally password-protect the page or show a sensitive-content acknowledgement first.
Bio pages have their own analytics (views and per-block clicks).
Retargeting pixels Pro
Users on a plan with retargeting can register marketing pixels under Pixels - Meta/Facebook, Google Ads, Google Tag Manager, Bing, Snapchat, Reddit and more. Once added, a pixel can be attached to any link; when a visitor passes through, the pixel fires (via a brief branded splash so the pixel can load) so the user can build retargeting audiences from their link traffic.
Connecting a custom domain (customer side)
Customers on a plan that allows custom domains can brand their short links with their own domain. From their Custom domains page:
- Enter the domain - e.g.
go.theirbrand.com. - Add the DNS records shown - a CNAME (subdomain) or A record (root domain) pointing at your platform, plus a TXT record to prove ownership. LinkForge displays the exact values (from your Domains settings).
- Click Verify - once DNS propagates, the domain is verified and appears in the domain picker when creating links.
Analytics
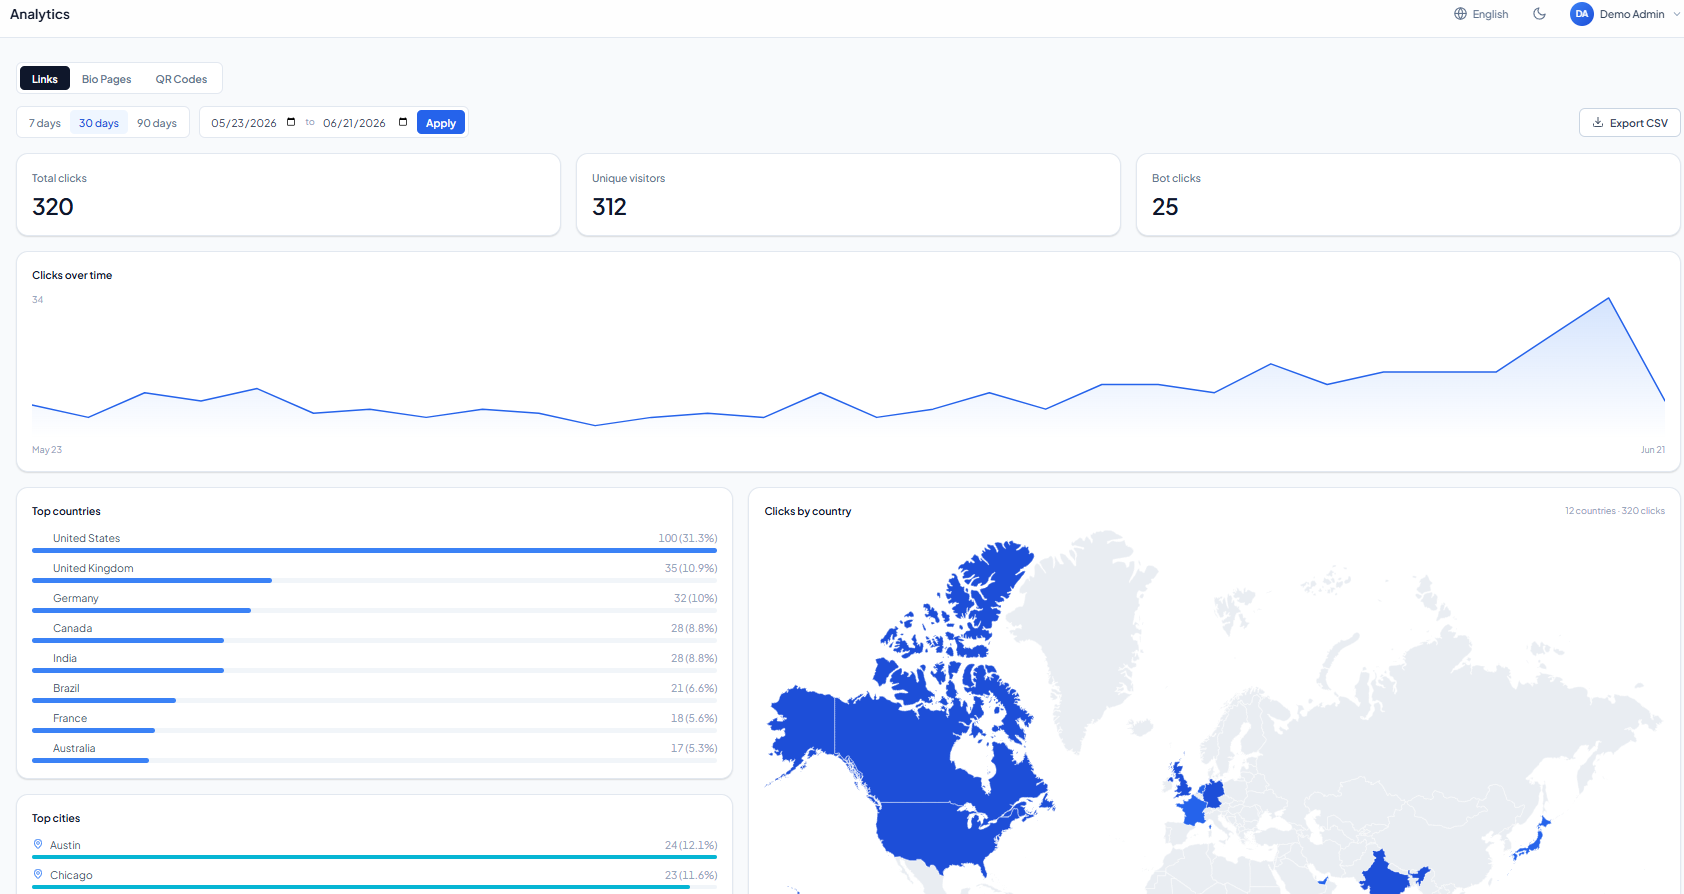
Every link, campaign, QR code and bio page has analytics, and there's a global Analytics view across everything. Users can see:
- Clicks over time - a trend chart with selectable date ranges.
- Geography - an interactive country map plus top countries and cities (city-level requires a city GeoIP database).
- Devices, browsers & operating systems.
- Top referrers - where the traffic came from.
- CSV export - download the underlying data for any view.
Monetization
The Monetization page lets a customer earn from their own traffic by showing a brief interstitial - a short waiting page with a skip timer - before their links redirect.
- Bring your own ads - add up to three ad slots, each holding the code from your ad network (a script tag or a banner snippet), shown on the interstitial in front of your links.
- Safe by design - every slot renders inside a sandboxed frame, so a third-party ad can never reach your dashboard or your visitors' sessions. Most self-serve script and banner networks work this way; a few that require same-origin access to the host page (such as Google AdSense) are intentionally blocked by the sandbox.
- Opt-in - advertising appears only when the operator has enabled the ad system and the customer has turned it on here.
It is a simple way to run a free, ad-supported tier while paid plans (with the ad-free feature) stay clean.
AI assist if enabled
When you've configured an AI provider, these helpers appear for users:
- Suggest with AI - on the link form, proposes short, memorable aliases from the destination URL and title.
- Write title with AI - on the link form, writes a clear title and short description for a destination URL in one click.
- Ask your links - a plain-English analytics assistant. Ask things like "Which links got the most clicks?", "Clicks this week vs last week", or "Top cities last 30 days". It answers with overall totals, per-link rankings, period comparisons, and breakdowns by country, city, device, OS, browser, referrer or language. The model only maps questions onto safe, pre-approved metrics; it never writes or runs database queries.
- AI performance summary - on any link's analytics page, a one-click plain-language read on how that link is doing, with a practical suggestion.
- Write bio with AI - in the bio-page builder, generates a display name, tagline and bio from a short description of the person or brand.
- Weekly insight - a short performance summary on each active user's dashboard, refreshed weekly.
Each use spends AI credits from the user's plan allowance, so AI spend stays predictable.
Billing & plans (customer view)
From Billing, a customer sees the plans you offer side by side, their current plan and how much of each limit they are using, then upgrades or downgrades whenever they like.
- Checkout uses whichever gateway you configured - Stripe and PayPal redirect to the provider, the crypto gateways show payment details, and the offline gateway records a manual payment.
- Instant updates - the moment a payment confirms (or immediately, with the offline gateway), the new plan's limits and features apply. A downgrade keeps existing data and simply enforces the lower limits from then on.
Affiliate / referrals
When you switch the affiliate program on, every customer gets a unique referral link on their Affiliate page to share. Anyone who arrives through that link and later upgrades to a paid plan within the cookie window earns the referrer a commission.
- Commission is calculated from the rule you set - a percentage of the payment or a fixed amount per sale.
- Status moves from pending to approved once you confirm it, then to paid after a payout.
- The dashboard shows referral clicks, sign-ups, and pending versus approved earnings, with a Request payout button that unlocks once the balance passes the minimum you set.
You review and approve everything on the admin side under Affiliate management, so no money moves without your sign-off.
Account & security
Under Account, users manage their own profile and security. It's split into two tabs:
- Profile - name, email and avatar (uploaded and auto-resized).
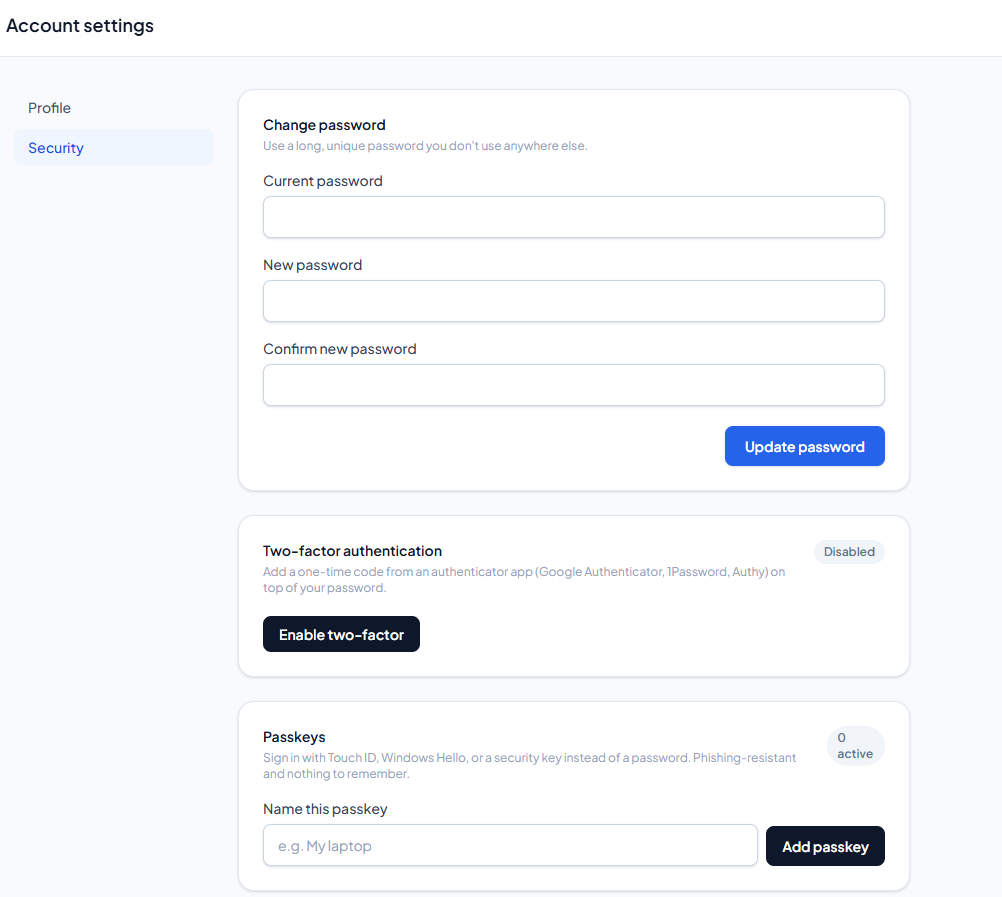
- Security - change password; enable two-factor authentication (authenticator app with QR setup + recovery codes); register passkeys (Touch ID, Windows Hello, security keys) for passwordless sign-in; link or unlink connected accounts (Google/GitHub/Facebook); and delete the account.
Support tickets
LinkForge includes a built-in help desk. Customers open tickets from their Support page and exchange replies; you answer them under Admin → Tickets. This keeps customer support inside your platform rather than scattered across email.
Admin guide
Admin dashboard
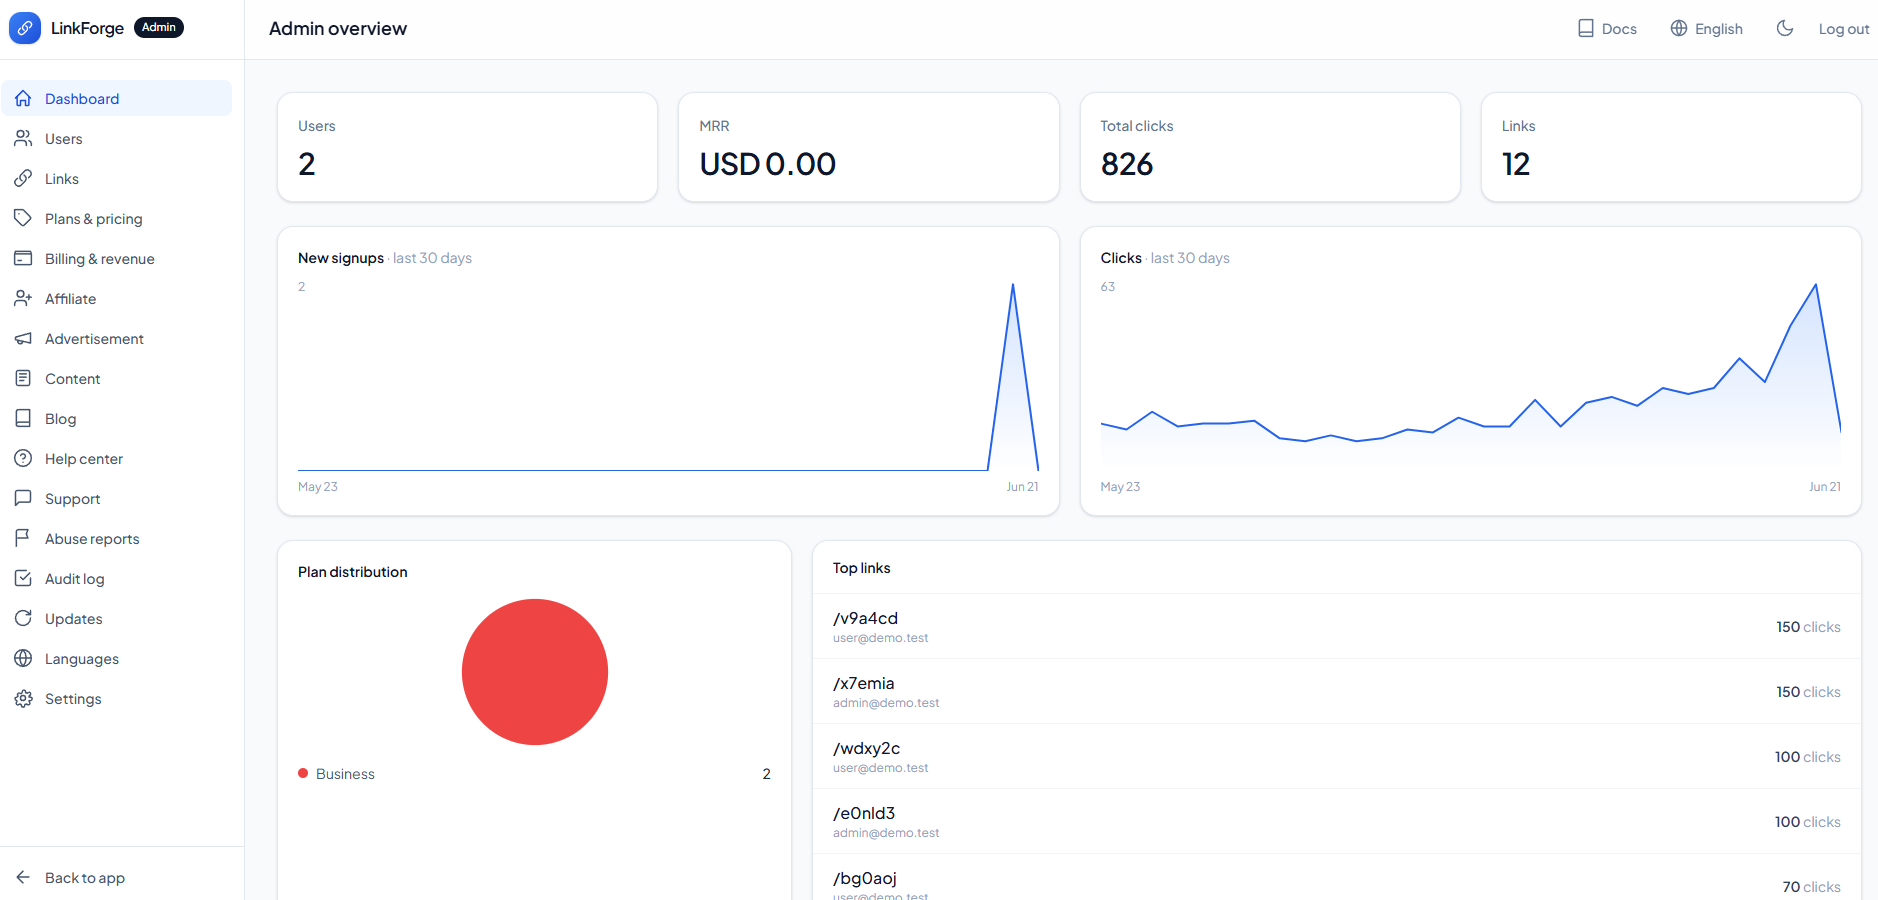
The admin area lives under /admin and is only visible to administrator accounts. Its dashboard gives you the health of the whole platform at a glance: total users, links and clicks, monthly recurring revenue, new-user and click trends, plan distribution, top links and recent sign-ups.
Managing users
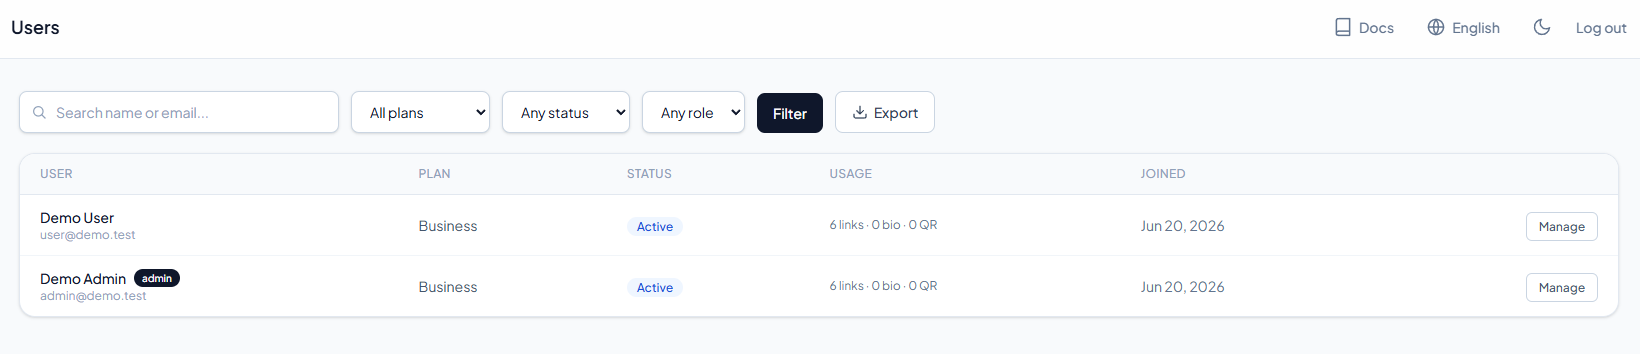
Under Admin → Users you can search and filter by plan, status or role, and open any user to see their links and subscriptions. For each user you can:
- Edit their details, change plan, or suspend / delete the account.
- Impersonate - sign in as that user to see exactly what they see (a banner lets you leave impersonation). Great for support.
- Send a password-reset link, or email the user directly from their detail page.
- Export the user list as CSV.
Bulk actions: tick several users in the list and activate, suspend or delete them in one step (admins and your own account are always protected).
Broadcast email
Admin → Broadcast sends a one-off email to all users or to everyone on a chosen plan. Messages are queued and delivered as the cron-driven queue drains, so even a large list never blocks.
Billing & subscriptions
Admin → Billing is your revenue desk: MRR, total and monthly revenue, active subscriptions and paying users. You can browse subscriptions (filter by status - trialing, active, past-due, canceled, expired) and payments (pending, completed, failed, refunded), and cancel a subscription (which moves the user back to the free plan).
Content moderation
Admin → Content lets you review user-generated content across three tabs - bio pages, QR codes and custom domains. Publish/unpublish or remove anything that breaks your rules. Combined with safety scanning, this keeps your platform clean.
Abuse reports
Anyone can report a suspicious link through the public /report page, so problem links surface even when the abuser is not one of your users. Reports queue under Admin → Reports with the reported link, the reason given and the reporter's note.
For each one you can block the link - it stops redirecting immediately and shows a safe notice instead - and mark the report actioned, or dismiss it as a false alarm. Paired with automated safety scanning, this gives you both proactive and reactive abuse control.
Support tickets
Admin → Tickets is the other side of the customer help desk. See open/answered/resolved tickets with an open-count badge, read the full conversation, reply, and set status and priority.
Advertisements
Run your own ads to monetize free-tier traffic. Under Admin → Ads, toggle the ad system on, set the interstitial skip delay, and create ad creatives for different placements (interstitial, banner, sidebar) with sort order and active toggles. This pairs with the customer Monetization page.
Affiliate management
When the affiliate program is enabled, Admin → Affiliate is where you control the money - nothing is paid automatically.
- Commissions - every referred sale creates a pending commission. Review them and approve the genuine ones or reject the rest (for example, a refunded order).
- Payout requests - when an affiliate requests a payout, it lands here. Mark it paid, which settles the approved commissions attached to it, or reject it back to the pool.
The commission rate, type and minimum payout themselves live in Settings → Affiliate.
Blog, Help & Pages
LinkForge includes three lightweight content tools to power your marketing, self-serve support and the legal pages every site needs:
- Blog (Admin → Blog) - write posts with a cover image, slug and draft/published status; they appear at
/blog. - Help Center (Admin → Help) - write help articles grouped by category; they appear at
/helpfor customers to search. - Pages (Admin → Pages) - editable Markdown pages rendered at
/page/<slug>. Your install ships ready-to-edit Terms of Service, Privacy Policy and Contact pages, already linked in the footer. Create your own custom pages too, and tick Show in footer to link any of them.
Audit log
Admin → Audit records significant actions across the platform - who did what, and when - so you always have a trail to fall back on. Typical entries include sign-ins, setting changes, plan and subscription changes, user suspensions, link blocks and applied updates.
Use it to investigate an unexpected change, settle a support dispute, or simply keep an eye on activity. Each entry keeps the actor, the action and a timestamp.
Localization
Languages & translations
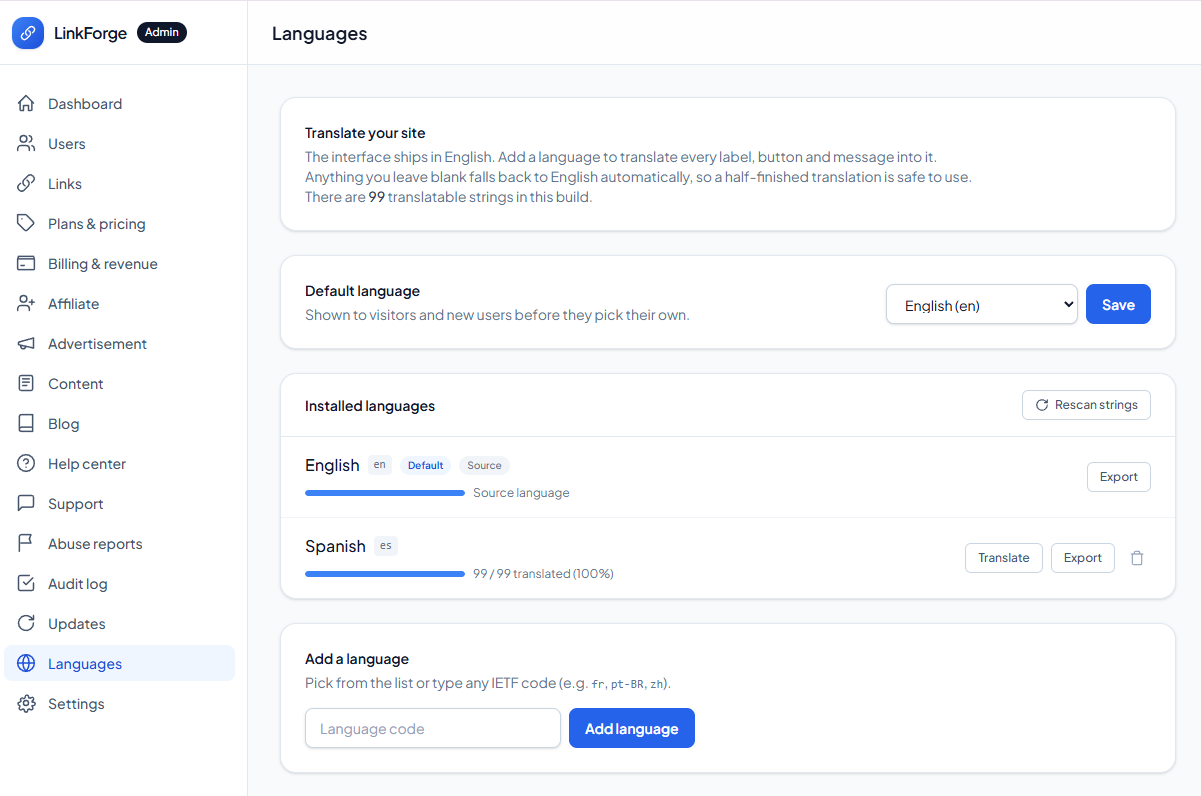
LinkForge ships an in-admin translation manager - no language files to edit by hand. Under Admin → Languages you can:
- See installed locales with a translation coverage bar.
- Add a language - creates an empty catalog; any untranslated key automatically falls back to English.
- Translate in a searchable key grid, with an "untranslated only" filter and right-to-left input support.
- Import / export a locale as JSON for offline translation or sharing.
- Set the default language new visitors see.
- Rescan to pick up any new translatable strings after an update.
Visitors switch language themselves with the globe menu in the header; their choice is remembered. English plus a complete Spanish translation are included.
Developer / API
REST API reference
LinkForge exposes a small, clean REST API so developers can create and manage links programmatically. It's available to customers on a plan with the API feature enabled (see Plans).
Authentication
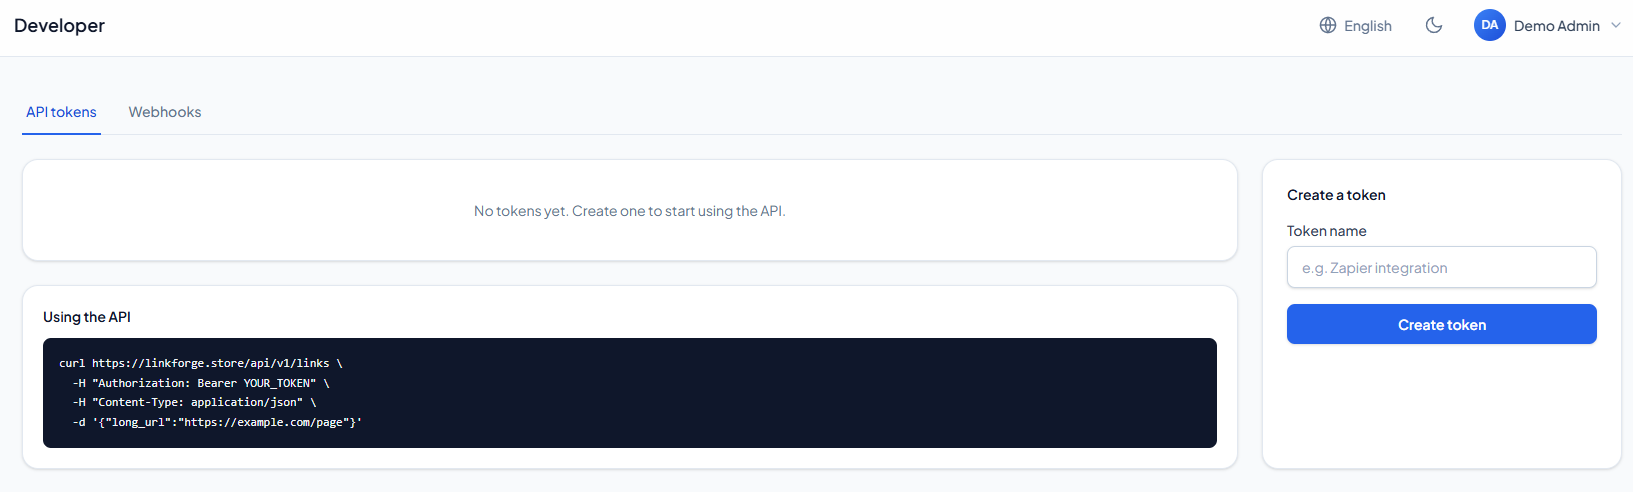
Each user creates a personal access token under Developer → API tokens. Send it as a Bearer token on every request:
Authorization: Bearer YOUR_API_TOKEN
Accept: application/json
The base URL is https://yoursite.com/api/v1. Requests are rate-limited to 120 per minute per token.
Endpoints
| Method | Path | Description |
|---|---|---|
GET | /api/v1/me | The authenticated user. |
GET | /api/v1/links | List your links (paginated). |
POST | /api/v1/links | Create a short link. |
GET | /api/v1/links/{id} | Retrieve one link. |
PUT | /api/v1/links/{id} | Update a link. |
DELETE | /api/v1/links/{id} | Delete a link. |
Example - create a link
cURLcurl -X POST https://yoursite.com/api/v1/links \
-H "Authorization: Bearer YOUR_API_TOKEN" \
-H "Content-Type: application/json" \
-H "Accept: application/json" \
-d '{
"long_url": "https://example.com/a/very/long/page",
"alias": "spring-sale",
"title": "Spring campaign"
}'{
"data": {
"id": 123,
"alias": "spring-sale",
"short_url": "https://yoursite.com/spring-sale",
"destination": "https://example.com/a/very/long/page",
"title": "Spring campaign",
"type": "direct",
"clicks": 0,
"is_active": true,
"safety_status": "safe",
"created_at": "2026-01-01T12:00:00Z"
}
}Fields & errors
long_url- required, valid URL, up to 2048 characters.alias- optional; auto-generated when omitted.title- optional label.is_active- optional boolean (on update).
Errors use standard HTTP codes with a JSON body - 401 for a bad token, 403 if the plan lacks API access, 422 for validation problems (e.g. a failed safety check or a hit plan limit), 429 when rate-limited.
Webhooks
Webhooks push events to your own systems in real time. A user adds an endpoint URL under Developer → Webhooks and chooses which events to receive:
| Event | Fires when… |
|---|---|
link.created | A new short link is created. |
link.clicked | A short link is clicked. |
link.flagged | A link is reported as abusive. |
Delivery format
LinkForge sends a POST with a JSON body and these headers:
X-LinkForge-Event: link.created
X-LinkForge-Signature: <HMAC-SHA256 of the raw body, keyed with your webhook secret>
Content-Type: application/json{
"event": "link.created",
"data": { "alias": "spring-sale", "short_url": "https://yoursite.com/spring-sale", "destination": "https://example.com/..." },
"sent_at": "2026-01-01T12:00:00Z"
}Verifying the signature
Always verify the signature so you know the request really came from LinkForge. In PHP:
verify-webhook.php$payload = file_get_contents('php://input');
$signature = $_SERVER['HTTP_X_LINKFORGE_SIGNATURE'] ?? '';
$expected = hash_hmac('sha256', $payload, 'YOUR_WEBHOOK_SECRET');
if (hash_equals($expected, $signature)) {
$event = json_decode($payload, true);
// …handle $event['event'] and $event['data']…
http_response_code(200);
} else {
http_response_code(403); // reject - signature mismatch
}Maintenance
Updating LinkForge
When a new version is released, you can update in one of two ways. Both preserve your data, .env, uploads and license.
Option A - In-app updater (easiest)
- Download the update package (linkforge-update-vX.Y.Z.zip) from your CodeCanyon downloads.
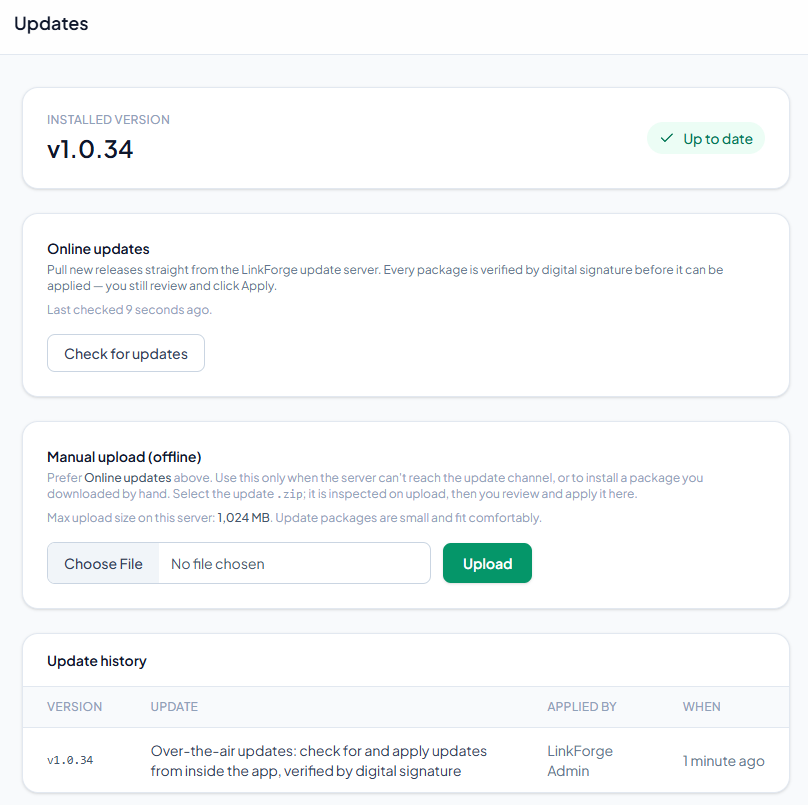
- Go to Admin → Updates. It shows your current version and the server's maximum upload size.
- Upload the update package. LinkForge inspects it and lists any issues (e.g. PHP version, permissions).
- Click Apply. LinkForge backs up replaced files, runs any new database migrations, clears caches and updates the version. Or Discard to cancel.
Option B - Manual overwrite
- Back up first (see Backups).
- In File Manager, extract the full install zip over your existing site, replacing files. Your .env, storage/installed and public/uploads are preserved.
- Delete the contents of bootstrap/cache/ (the
*.phpfiles) to clear cached config.
Backups
Back up before every update, and on a regular schedule. Two things to save:
- The database - in cPanel → phpMyAdmin, select your database → Export → Go (or use cPanel's Backup Wizard).
- The files - at minimum your .env and public/uploads/ (logos, avatars, bio uploads). A full account backup in cPanel captures everything.
Troubleshooting
| Symptom | Likely fix |
|---|---|
| Blank page / 500 error | Confirm PHP is 8.2+; make storage/ and bootstrap/cache/ writable (755); clear bootstrap/cache/*.php. |
| "Could not connect to the database" | Re-check the DB name/user/password and that the user has ALL PRIVILEGES. Host is usually localhost. |
| Page loads but looks unstyled | Make sure the document root points at public/ (Option A) or the root .htaccess is present (Option B), and that public/build/ uploaded fully. |
| Stuck on the installer after finishing | Confirm storage/installed was created and storage/ is writable. |
| Analytics charts stay empty | The cron job isn't running - add the once-a-minute schedule:run entry. |
| Images / uploads not saving | Make public/uploads/ writable (755). |
| Emails not sending | Configure SMTP; match port↔encryption (587↔tls, 465↔ssl); verify SPF/DKIM for your From domain. |
| Subscriptions stay "pending" after payment | The gateway webhook/IPN URL isn't reaching your site - re-check it and ensure HTTPS. |
| Customer domain shows your host's 404 | DNS is right but your server doesn't answer for that host - complete the operator domain setup. |
| "Verification TXT record not found" | The TXT record hasn't propagated or is on the wrong name; wait and retry. |
Frequently asked questions
Do I need to know how to code?
No. Installing and running LinkForge is point-and-click. The full source is included for developers who want to extend it, but it isn't required.
Do I need Composer, Node or the command line?
No. The download includes the vendor/ folder and pre-built assets, and the installer runs in your browser. The only command-line-ish step is adding one cron entry, which cPanel does through a form.
Can it run on shared hosting?
Yes - that's the primary target. No Redis, no daemons, no special services.
Are the AI features required?
No. They're entirely optional and hidden until you add an API key. You own and control any AI spend.
Can customers use their own domains?
Yes, on plans you allow. See operator setup and the customer flow.
Will updates overwrite my settings?
No. Updates preserve your .env, database, uploads and license - see Updating.
Can I remove all LinkForge branding?
Yes - upload your own logo and theme under Appearance, and use the white-label plan feature for a fully unbranded customer experience.
Reference
Sources & credits
LinkForge bundles the open-source software and data below, each under its own license. The complete notices are in THIRD_PARTY_LICENSES.md in your download. If you redistribute or modify LinkForge, preserve the attributions that require it (notably DB-IP and the OFL fonts).
Data
| Asset | License | Source |
|---|---|---|
| DB-IP IP-to-Country Lite | CC-BY-4.0 | db-ip.com |
Fonts (self-hosted, OFL-1.1)
Plus Jakarta Sans, Poppins, DM Sans, Space Grotesk, Lora - each under the SIL Open Font License 1.1.
Icons & graphics
| Asset | License | Source |
|---|---|---|
| Simple Icons | CC0 / MIT | simple-icons |
| Flag Icons | MIT | lipis/flag-icons |
| Lucide | ISC | lucide-icons |
| Bootstrap Icons | MIT | twbs/icons |
| @svg-maps/world | MIT | svg-maps |
Libraries
JavaScript: qr-code-styling (MIT), jsPDF (MIT), Tailwind CSS (MIT), Axios (MIT). PHP: Laravel framework, Fortify, Sanctum, Tinker (all MIT), Livewire (MIT), endroid/qr-code (MIT), geoip2/geoip2 (Apache-2.0). Brand marks shown via icon sets remain trademarks of their owners and are used for identification only.
Changelog
Version 1.0 - Initial release
- Branded short links with custom domains, aliases, passwords, expiry, click limits, UTM builder, geo/device targeting and weighted rotation.
- QR Code studio, link-in-bio pages, retargeting pixels, campaigns, bulk create & CSV import.
- Deep analytics with country/city geo map and CSV export.
- SaaS billing with four gateways (Stripe, PayPal, CoinPayments, Crypto.com) plus offline, configurable plans, and an affiliate program.
- Optional AI assistant (Anthropic / OpenRouter), safety scanning, social login, 2FA & passkeys.
- Browser-based installer, in-app updater, multi-language manager, blog & help center, full admin panel and REST API.
Support & contact
We're glad to help. The fastest route is your CodeCanyon item's Support tab - that ties your message to your purchase so we can respond quickly. You can also email us directly at hello@sangeeth.biz, or visit our website at sangeeth.biz.
Before you reach out, please include
- Your LinkForge version (shown in Admin → Updates).
- Your hosting type (cPanel shared, VPS, etc.) and PHP version.
- The exact steps to reproduce, and any error message or screenshot.
- Whether you've checked the relevant Troubleshooting row.
Item support covers installation help, bug fixes and answering usage questions. Significant customization of your install is outside standard support, but we're happy to point you in the right direction. Thank you for choosing LinkForge!